Back to Asset Essentials Main Menu
Adding and using Cost Centers
Cost centers can represent budget accounts or groups of people, such as departments, within your organization that help group costs tracked on work orders. Cost centers can be applied to work orders as a whole or to individual work order transactions, such as labor, parts, or equipment usage. You can also bulk update work orders to be tied to a cost center. Once they are tracked over time, you can generate reports to calculate the total costs per cost center.
For example, your production company has a budget for meetings. You would then make a cost center called Meetings. When a work order is created to represent a new meeting, the purchases made and labor worked in order to get the meeting ready would be tracked on that work order. From there, you would go to the work order and select the Meetings cost center. Once the work is done and the various transactions are tracked, you would then generate a report to see how much money was spent for that cost center.
How to create a Cost Center
Site Administrators, Account Administrators, or Global Administrators are able to create cost centers.
- Click on the Admin menu icon and select Configurations.
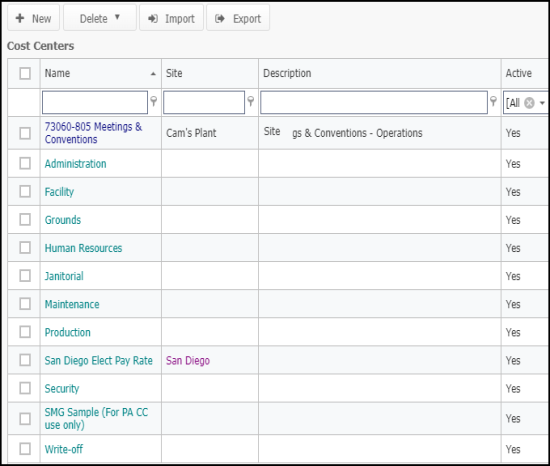
- Click on Cost Centers in the Work Order section.
- Click on the New button.
- Select a Site from the drop-down menu, if you want to only use that cost center for work being done at a specific site.
- Enter a Name for your cost center that aligns with the budget account or group of people responsible for payments tied to this cost center.
- Enter a Cost Center #, Color, or Description, if needed.
- Click Save.
How to apply Cost Centers to Work Orders and transactions
You can apply a cost center to a work order or to individual work order transactions. If you apply cost centers to both the work order and the transactions, the cost center tied to the transaction will override the one tied to the work order.
Applying Cost Centers to Work Orders
- Click on the Work Orders menu icon and select Work Orders.
- Select a work order from the list.
- In the Planning section, select the appropriate Cost Center from the drop-down menu.
- Click Save at the top of the page. All transactions added to this work order will be tracked under this cost center, unless otherwise specified on the transaction.
Applying Cost Centers to transactions
- Click on the Work Orders menu icon and select Work Orders.
- Select a work order from the list.
- While tracking your labor, parts, purchases, or equipment usage, be sure to select the cost center before saving your transaction. The cost center you chose can vary between each transaction, if necessary.
- Click Save at the top of the page.
How to bulk update Cost Centers on Work Orders
You can update multiple work orders at one time in order to apply a common cost center to them.
- Click on the Work Orders menu icon and select Work Orders.
- Check the boxes next to the work orders you need to apply one cost center to.
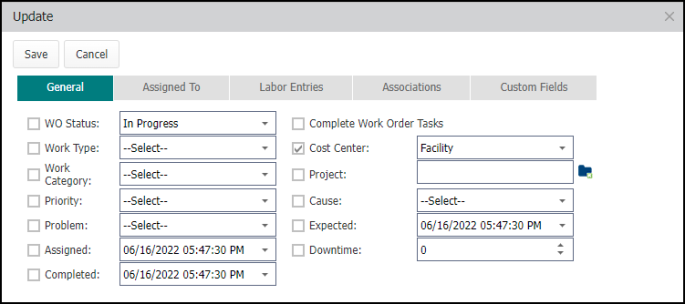
- Click the More drop-down menu at the top of the list and select Update.
- Check the box next to Cost Center and select the appropriate cost center from the drop-down menu.
- Click Save.
How to report on Cost Centers
You can generate and export reports that will help you calculate total costs for your various cost centers. We recommend using the Work Order summary page, WO Labor summary page, and WO Parts summary page to help you create custom views and export the information to be sure you are only pulling the most important data needed for your cost center analysis.
Reporting from the work order summary page
- Click on the Work Orders menu icon and select Work Orders.
- If you have a preset view to narrow down your work order list, select it from the View drop-down menu.
- If you want to include all work orders for your Site, select No View from the drop-down menu.
- Click Advanced Filters.
- Choose the appropriate Date Type and Date Range to narrow down the list of work orders you want to report on.
- Click the Columns button, then click the arrow next to Work Order Fields.
- Check the boxes next to Cost Center and Grand Total.
- Click Apply.
- You can enter a specific Cost Center in the sort by box under the column header or leave it open to report on all cost centers.
- Click the More button at the top of the list, then select Export.
- Be sure to Export as CSV and only include Visible Columns to report on the filtered data.
- Check All under Select pages, then click OK.
Reporting from the WO Labor summary page
- Click on the Work Orders menu icon and select WO Labor.
- If you have a preset view to narrow down your work order list, select it from the View drop-down menu.
- If you want to include all labor transactions for your Site, select No View from the drop-down menu.
- Click Advanced Filters.
- Choose the appropriate Date Type and Date Range to narrow down the list of work orders you want to report on.
- Click the Columns button.
- Click and drag the Cost Center and Sub total($) fields onto the labor summary grid.
- You can enter a specific Cost Center in the sort by box under the column header or leave it open to report on all cost centers.
- Click the More button at the top of the list, then select Export.
- Be sure to Export as CSV and only include Visible Columns to report on the filtered data.
- Check All under Select pages, then click OK.
Reporting from the WO Parts summary page
- Click on the Parts & Purchase Orders menu icon and select WO Parts.
- If you have a preset view to narrow down your work order list, select it from the View drop-down menu.
- If you want to include all part transactions for your Site, select No View from the drop-down menu.
- Click Advanced Filters.
- Choose the appropriate Date Type and Date Range to narrow down the list of work orders you want to report on.
- Click the Columns button.
- Click and drag the Cost Center and Extended fields onto the parts summary grid.
- You can enter a specific Cost Center in the sort by box under the column header or leave it open to report on all cost centers.
- Click the More button at the top of the list, then select Export.
- Be sure to Export as CSV and only include Visible Columns to report on the filtered data.
- Check All under Select pages, then click OK.


